Export Templates
Cheetah Messaging allows you to extract data from your database in order to use that data outside of the platform for further analysis, or as input into some other process or system. These extracts from the database are called "Exports." An Export is defined through the use of a reusable Export Template that controls the content and layout of the extract, the schedule of when and how often it runs, and the destination of the extract file.
Create new Export Template
1. In the System Tray, select Data Integration > Processes > Export.
2. In the Tool Ribbon, click New.
3. From the folder tree, select the folder where the Export Template will be saved.
4. In the Name field, enter a unique name for the Export Template.
5. Select the source table from which this Export Template will extract data.
6. ClickSave New Item.
Set criteria for the export
The Source Data section allows you to select how you want to define the records that are included in the Export file.

1. Select the desired tab on which to base the export data:
Filter Result: Browse for the desired Filter, or create it. Records selected by the Filter logic will be included in the Export.
Custom Procedure: From the "Procedure" drop-down menu, select a custom stored procedure.
Activities / Responses
Using the Activity Type drop-down, select from the activities recorded in the platform. Enter or select your criteria for the selected activity type. Records meeting the criteria will be included in the Export.
Note: If you select "Import Exceptions" as the Activity Type, the system will utilize a default file layout for the Export file. You can't make any changes to the fields contained within this layout. The Export file will include information about the exception condition, the record number, and any error messages.
Set up the export file layout
The Set up File Layout section allows you to define the structure and content of the Export file.
1. To include a header row in the exported file, check the Include a header row? checkbox.
2. From the drop-down menu, select a delimiter character - tab, comma, pipe, or semi-colon.
3. From the Available Fields list box,choose the fields to be exported.
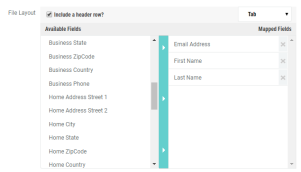
4. Click the center bar to move the selected field (or fields) to the Mapped Fields list box.
5. To rearrange the fields within the Export file, drag-and-drop thefields within the Mapped Fieldslist box into the desired sequence.
6. To remove a selected field, click the X to the right of the field name in the Mapped Fields list box.
Using Activities / Responses as a data source
If you selected "Activities / Responses" as the data source, two additional sections are displayed: Exclude Fields and Metadata.
1. System fields (such as Campaign ID, Message ID, etc.) are included by default in the Export file. In the Exclude Fields section, select one or more system fields that you want to exclude when generating the Export file.
2. In the Metadata section, select the Metadata fields that you want added to the Export layout.
Define the export schedule
The Automate Exports section allows you to optionally set a schedule for automatically generating the Export file.
Note: If you don't want to set an automated schedule, click No Schedule. You can manually execute the export process on an ad hoc basis. (see "Topic 6: Manually execute the export" for details)
1. To define an automated schedule, click Auto-Generate on Schedule
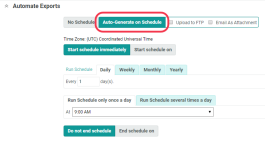
2. Select a delivery method:
-
To upload the Export file to an FTP server or Amazon S3 Bucket, check the Upload to FTP/S3 check box; enter the FTP or S3 information.
-
To send the Export file as an email attachment, check the Email as Attachment check box; enter the email notification details.
Note: Never email files containing Personal Identifying Information (PII).
3. Set the schedule:
-
Click Start schedule on and enter the appropriate date and time for the automated schedule to go live.
-
Or, select Start schedule immediately if you want the schedule to go live immediately after you enable it.
4. Define the Export schedule frequency interval -- daily, weekly, monthly, or yearly.
Note: For each interval option, you can define additional detail, such as which days of the week, or a specific day of the month, for example.
5. Define the time of day when the Export file is generated.
6. Set the end date of the scheduled export:
-
To run the Export indefinitely, select Do not end schedule.
-
To set an end date for the Export, select End schedule on, and enter the end date and time.
7. In the Tool Ribbon, click Save.
8. Click Start Schedule in the Tool Ribbon to enable the schedule.
Manually execute the export
Exports can be manually executed on an ad hoc basis.
1. In the Tool Ribbon, click Save and Generate File.
2. The system begins creating the Export file. See "Topic 7: View the exported file" for details on how to download the file when it's ready.
View the exported file
All the Export files generated from an Export Template are available to be downloaded.
1. Click Exported Files in the Function Menu.

2. The system displays a list of all Export files created from this Export Template, along with a status, start date / time, end date / time, and the number of rows in the file.
3. To refresh this list to see the most current status, click the refresh icon.
4. Next to a finished Export file, click the download link in the Export ID column. The system downloads the file to your local PC.